Trail Running Safety from the Ground Up: Terrain, Weather, Pace and Water Choices
A quiet dirt path can shift faster than you expect once you leave smooth pavement. Rocks move, roots grab, clouds grow, and your legs or water can run out sooner than planned. Staying in control has less to do with toughness and more to do with simple habits: looking ahead, starting conservatively, and making small adjustments early.
This story is part of DailySeekers's practical reading library across everyday topics.
Before You Step Off The Road: Simple Checks That Change The Day
Matching the route to your current condition
A few minutes of planning can remove a lot of unnecessary risk. Before tying your shoes, match the path to how you actually feel today.
Look at distance, climbing, and surface. If you are still learning to handle uneven ground, avoid routes described as very steep, rocky, or highly technical. Choose smoother options where slowing to a walk on tricky sections feels normal.
Think beyond the map. Check daylight and what the forecast suggests about temperature, wind, and precipitation. If you are already tired from training, work, or travel, swap the ambitious loop for a shorter or less hilly option and agree with yourself that more hiking is allowed. Starting with a realistic plan lowers the odds of rolled ankles, rushed decisions in fading light, or pushing on when you should turn back.
Fast gear and body scan at the trailhead
Right before you set off, a short head‑to‑toe check can catch problems while it is still easy to fix them.
Footwear is a big part of that check. Shoes with decent grip and a stable platform help you stay upright on loose ground. Make sure they are broken in rather than brand‑new for a long outing. If you can, jog a short downhill stretch near the start and notice whether your feet slide or your ankles feel wobbly. If anything feels off, shorten the route, slow the pace, or plan to walk steeper parts.
Run through a quick list: laces tied securely, no obvious hot spots, water and a small snack if you will be out for a while, and layers that match the expected conditions. A few ankle circles, gentle lunges, and light hops can wake up balance and coordination. These tiny rituals reduce the chance of blisters, awkward stumbles, or feeling underprepared once you are committed.
Moving Over Roots and Rocks: Training Your Eyes and Feet
Seeing patterns in uneven ground
At first glance, natural surfaces can feel chaotic. With practice, they start to look more like repeating patterns your eyes can read in advance.
Instead of staring straight down at your shoes, let your gaze rest a few strides ahead. Notice the direction of roots across the trail, the angle of exposed stones, and shifts from firm to soft or sloping ground. Mentally tag sections as solid or loose, dry or slick, flat or tilted.
Where the path is muddy or scattered with wet roots and rocks, look for textured edges rather than shiny, smooth patches that tend to be slippery. Aim for light steps that allow you to change your landing if something rolls or breaks underfoot. When you are unsure, slow down, shorten your stride, and place each foot more deliberately instead of committing to big, fast steps.
Adjusting body position on climbs and descents
Once your eyes are choosing where to go, your body needs to stay balanced as the slope changes.
On climbs, think about shorter steps and a quicker rhythm, with a gentle lean from the ankles. Lifting your knees a bit higher than on flat surfaces can give your feet extra clearance over roots and stones.
On the way down, resist the urge to reach far in front of you with each stride. Keeping your feet closer to under your hips makes it easier to respond when you hit loose grit, a surprise hole, or a rolling rock. A relaxed upper body with arms a little wider helps with balance. Let your speed match how complex the surface feels rather than an idea of how fast you “should” be going. Over time, this steady rhythm of scanning ahead, picking stable spots, and moving lightly can turn uneven ground from intimidating to familiar.
Reading The Sky And Your Effort: Adapting As Conditions Shift
Noticing what the air is telling you
Weather changes how demanding every step feels, even when your watch numbers look the same.
Before you leave, notice cloud cover, sun strength, wind, and humidity. Bright sun with heavy, still air often means your body will struggle more to cool itself. In those situations, it helps to start at an easier intensity and allow room to shorten the distance.
While you are out, keep checking both the sky and how your body feels. Sudden strong sunshine after cooler shade, warmer wind, or a sense that the air is getting heavier can all be signs to ease off. If a pace that usually feels relaxed now comes with labored breathing, a pounding heartbeat, or sweat that is not cooling you, treat that as a warning to slow down or take a brief walking break.
Hydration supports your body’s cooling, but it does not erase the load that heat and humidity place on you. Steady sipping and using shade when you find it are simple tools for staying ahead of problems rather than reacting once you are already exhausted.
Letting internal effort guide your pace
When conditions are tough, chasing usual pace numbers can quietly push you past your limits.
Use internal effort or heart rate as your main guide. An effort level where you could speak in short sentences is a reasonable marker for an easier outing. If that same effort shows a slower pace than you are used to, accept the slower number as feedback rather than something to fight.
Short walk sections on steep slopes, small pauses in shade, or choosing the smoother side of the trail all count as effective pacing tools. They preserve energy and focus for later sections instead of burning everything early. When the air cools a little or a breeze picks up, your speed can naturally rise again even if your perceived effort stays steady.
This flexible mindset reduces the risk of heat‑related issues, helps you finish feeling more in control, and keeps off‑road running closer to exploration than struggle.
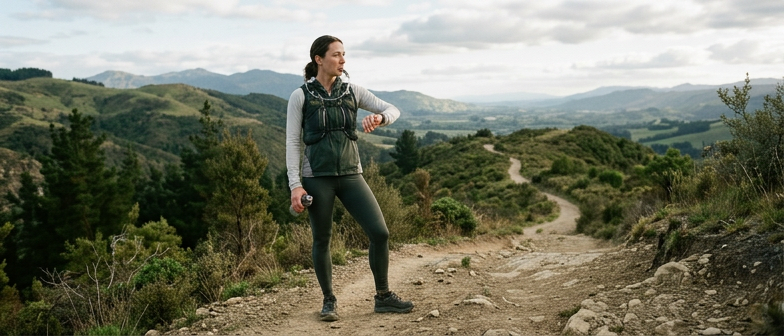
Water, Layers And Getting Back: Smarter Solo Habits
Fluids and carrying options
On remote paths, running out of water turns a minor problem into a serious one. Planning how you will drink is just as important as planning where you will go.
Aim to start with more fluid than you expect to use, especially when the route is longer, steeper, or warmer than your usual runs. Sip steadily instead of waiting until you feel extremely thirsty. If your outing passes natural water sources or covers unfamiliar ground, a compact way to treat water can provide a useful backup in case your outing takes longer than planned.
Different carry systems come with their own trade‑offs:
| Carry method | Main strengths | Main limitations | Best suited for |
|---|---|---|---|
| Handheld bottle | Simple, easy to sip and refill | Occupies a hand, limited total volume | Shorter outings |
| Waist belt with flasks | Keeps hands free, quick to access | Can bounce if overloaded | Rolling terrain |
| Vest or pack with bladder | High capacity, distributes weight well | Warmer on hot days, needs more adjustment | Longer efforts |
Whichever option you pick, make it easy to see how much you have left, whether through clear containers, markings, or familiar feel. That way you can adjust pace or route before you are down to the last mouthful far from the trailhead.
Extra clothing, navigation, and contact plan
Conditions and effort shift quickly once you move away from paved areas. A simple, flexible clothing system can turn a small delay into an inconvenience instead of a crisis.
Light, breathable layers that can be added or removed as you warm up or cool down usually work better than a single thick item. A moisture‑managing top, a warmer middle layer, and a wind‑ or water‑resistant shell cover most situations. Even on apparently mild days, a thin insulating piece can make an unexpected stop after a twist or fall more manageable. Small items like gloves or a lightweight hat take up little space yet add a lot of comfort when the wind picks up or the temperature drops.
Finding your way back is just as important as feeling comfortable while you move. In unfamiliar areas, carrying a paper map alongside a digital map stored for offline use provides a backup if batteries fail or signals weaken. A small light, a basic whistle, and a charged phone or watch help you handle a later‑than‑planned finish.
For solo days, tell someone you trust where you are going and when you plan to return. Share the general route and any alternate options you might take. That simple message creates a clear path for follow‑up if you do not check in, adding one more quiet layer of protection to your time in the hills and forests.
Q&A
-
How can I build reliable terrain awareness habits on unfamiliar singletrack?
Start by deliberately scanning three zones: five meters ahead for lines, two meters for hazards, and your next footfall for precise placement. Pair this with occasional micro-pauses to reassess surface changes. Over time, this structured visual routine becomes automatic, dramatically improving reaction time and reducing trips or ankle rolls. -
What should a quick trail running safety checklist include before a solo run?
A practical checklist covers route clarity, daylight buffer, current weather radar, hydration carry options, emergency contacts, and basic repair items like tape and blister care. Add a clear “turn‑around time” rule and a simple check‑in plan. Keeping this list written and visible at home turns safety from guesswork into a repeatable habit. -
How do I review weather risks in a way that actually changes my decisions?
Instead of glancing at an icon, translate the forecast into specific choices: earlier start time, shorter loop, lower elevation, extra layer, or higher water volume. Pay special attention to rapid temperature drops, thunderstorms, and high humidity. Make one written adjustment for heat, one for wind, and one for storms before you leave. -
What pacing strategy works best on long hills during trail runs?
Use a “talk test” combined with short, repeatable walk breaks near the start of each climb, rather than waiting until you are exhausted. Keep steps short, cadence steady, and watch for breathing spikes as cues to shift to hiking. This protects your legs for descents and helps maintain concentration for careful foot placement. -
How can I improve foot placement focus while staying safe on solo runs?
Train foot placement by doing controlled downhill repeats where the priority is quiet, precise landings, not speed. Combine this with solo run safety rules: no headphones in technical sections, regular body scans, and predetermined bailout points. This link between focused feet and conservative decision‑making keeps technical terrain challenging yet manageable when you are alone.