Portable Strength, Real Results: Resistance Band Workouts for Upper and Lower Body
A simple loop of elastic material can quietly replace a room full of bulky machines. With thoughtful positioning and steady control, it can warm stiff joints, challenge major muscle groups, and support recovery. Whether you are in a living room, hotel, or park, focused strength work becomes genuinely portable and surprisingly versatile.
This story is part of DailySeekers's practical reading library across everyday topics.
How an Elastic Loop Turns Into a Whole‑Body Trainer
A closed loop of stretchy material looks basic, yet it can turn familiar movements into focused strength practice. As you pull the band in a squat, press, or row, tension rises the farther you move. Muscles tend to be stronger near the top of a lift, so this rising pull often matches how your strength changes through the range.
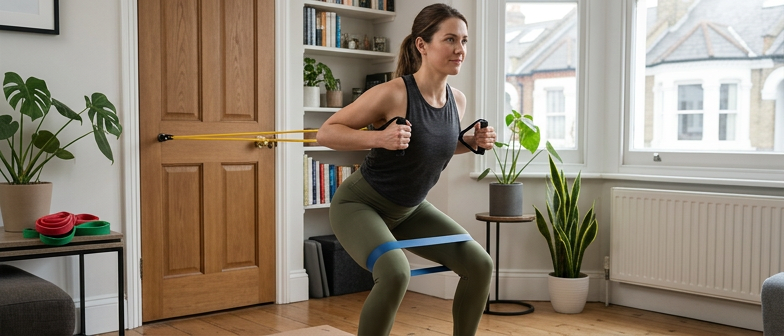
Because the loop can be pulled in many directions, one piece of equipment can cover lower body, upper body, and mid‑section. Stepping on it lets you set up squats or hip‑hinge patterns. Wrapping it around your back turns pushes into chest work. Fixing it in front of you creates a smooth path for rowing moves. The pull builds gradually instead of jolting the joints, which helps many people move through a comfortable range.
The same loop can bridge the gap between gentle mobility work and demanding strength circuits. Lighter options guide shoulder circles, seated leg stretches, or side leg raises for the hips. The elastic encourages slow, deliberate movement rather than swinging and jerking. Thicker options can challenge squats, hip bridges, overhead presses, and curls in a corner of a room, with intensity adjusted by shortening the band or widening your stance.
When a Loop Makes Sense, and When It Might Not
Used thoughtfully, this simple tool can support many different training goals, but it is not a perfect fit for every situation.
| Situation or goal | How an elastic loop helps | Possible limitation or trade‑off |
|---|---|---|
| Learning basic movement patterns | Slow tension encourages control and body awareness | Maximum load can be lower than heavy free‑weight options |
| Training in limited space | Many drills stay almost in place | Needs careful setup to avoid the band snapping or slipping |
| Gentle joint‑friendly sessions | Smooth pull reduces sudden impact | Some positions still feel awkward for very stiff joints |
| On‑the‑go strength while traveling | Light, packable, easy to store | Requires an anchor or stable stance in unfamiliar spaces |
From Easy Flow to Muscle Burn: Building a Session
Thoughtful training with elastic loops feels like a smooth arc: gentle at the start, focused in the middle, and calm at the end. One simple way to plan is to think in four blocks: warm‑up, activation, main work, and a short finisher.
Shaping the Start of Your Session
Early minutes are about waking tissues up rather than chasing fatigue. A few minutes of relaxed marching in place, loose arm swings, and unweighted hip hinges can raise body temperature and get blood moving.
Once your joints feel less stiff, lighter elastic pieces come in. Slow lateral steps with a loop around the legs, easy rows from a high anchor, or controlled hip bridges help specific muscles “switch on.” The aim is to feel key areas working without strain and improve how smoothly the main drills feel.
Organizing Main Work and Finishers
In the main block, choose four to six multi‑joint drills so you get a lot done with minimal setup. Options include squats, hip‑hinge patterns, horizontal presses, vertical presses, and rowing moves. For each, pick a band tension that makes the final few repetitions feel demanding yet still tidy. Rest briefly between sets so you can repeat the same quality effort.
A short “burn” section at the end can focus on one or two areas you want to feel more strongly, such as the hips or shoulders. Mini loops around the legs for repeated side steps, or higher‑rep rows with a lighter band, can create local fatigue while you keep your posture steady. Closing with gentle stretches and relaxed breathing brings the nervous system down a notch and supports recovery.
Simple Upper–Lower Pairings in Small Spaces
When floor area is tight, pairing an upper action with a lower move keeps more of the body working without needing to move around much. Elastic tools are especially useful here because you can create meaningful tension even in a narrow space.
Why Pairing Top and Bottom Works
Alternating between the top and bottom half of the body lets one area rest while the other works, without long pauses. This keeps heart rate moderately elevated while still allowing good technique. Because the loop can pull horizontally, vertically, or diagonally, you can design pairings that stay almost in one spot.
For example, a standing row followed by a squat keeps you mostly rooted to the floor. Anchoring the band at about chest height, taking a small step back, and rowing toward your ribcage challenges the upper back. Shifting into squats while still holding the band at shoulder level loads the legs and mid‑section. Minimal shuffling is needed, which is helpful in narrow rooms or beside furniture.
Another pairing uses overhead presses and reverse lunges. Standing on the center of the band, you drive the arms overhead under control, then step one foot back into a lunge and return, alternating sides. Keeping steps short helps you stay inside a limited training zone while still training balance and leg strength.
Sample Pairings for Different Focus Areas
The options below illustrate how pairings can nudge the focus without extra equipment or space.
| Focus area | Example upper move with a loop | Example lower move in the pairing |
|---|---|---|
| Back and glutes | Standing row from a front anchor | Band‑resisted squat or hip hinge |
| Shoulders and thighs | Overhead press while standing on loop | Reverse or split squat in place |
| Chest and hips | Chest press with band around back | Side steps or diagonal banded walks |
| Arm strength and balance | Biceps curl while standing on loop | Single‑leg or staggered‑stance deadlift |
These patterns can be cycled for several rounds with short rests, offering coverage for many major regions in a relatively brief window of time.
Safer Joints, Setup Details, and Gentle Progressions
Getting the most out of elastic tools comes down to more than just pulling harder. The way you set up, align your body, and adjust difficulty makes a big difference to comfort and long‑term progress.
Setting Up for Control and Comfort
Before the first repetition, check that the anchor point is steady and that the band is not frayed or twisted. If you are looping around a fixed object, make sure the connection cannot slide under tension. Give the band a few gentle test pulls, gradually increasing the stretch to confirm that nothing shifts.
Your stance and posture form the second layer of safety. A slight bend in the knees, feet roughly under the hips, and a tall but relaxed spine create a dependable base. For both pulling and pressing actions, cues such as “soft shoulders,” “long neck,” and “ribs stacked over pelvis” can help. If the band pulls you off balance or you feel yourself leaning, shorten the distance from the anchor or choose a lighter option.
Tempo also matters. Driving out against the band over about two seconds, pausing briefly, and returning under control over another two or three seconds prevents the elastic from slingshotting your joints into uncomfortable end ranges.
Gradual Increases Without Guesswork
Adjusting difficulty does not have to be complicated. Three levers cover most needs:
- Repetition count: Adding a couple of extra clean repetitions while keeping form steady.
- Distance: Stepping a little farther from the anchor or shortening your grip to raise tension.
- Band thickness: Moving to a slightly heavier loop once the current one feels too easy.
Changing just one of these at a time makes it easier to notice how your body responds. If repetitions start to feel wobbly, if you catch yourself holding your breath, or if you sense sharp or unusual discomfort, stop one or two repetitions earlier rather than pushing through.
Consistent, manageable efforts tend to support better results than rare, all‑out sessions. By treating an elastic loop as a precise tool instead of a toy to tug at randomly, you can build strength, control, and confidence in a way that fits neatly into everyday life.
Q&A
-
How do resistance band workouts compare to traditional weights for portable strength training?
Resistance band workouts provide variable resistance through the full range of motion, making them ideal for portable strength training when dumbbells or machines are not available. While maximum load is lower than heavy barbells, bands can closely mimic many upper and lower body patterns, challenge stability, and are easier to transport, store, and use safely in small spaces. -
What are effective upper body exercises using home fitness equipment like resistance bands?
For upper body exercises, bands can be anchored in front for rows, overhead for pulldowns, or wrapped around the back for presses. Banded push‑ups, face pulls, curls, triceps extensions, and diagonal chops train major upper body muscles. Adjusting stance, grip width, and band tension easily scales difficulty without needing multiple pieces of home fitness equipment. -
How can I target lower body activation with minimal equipment while traveling?
Lower body activation on the go can rely on mini‑bands above the knees for side steps, monster walks, and glute bridges, plus long bands for assisted squats or hip hinges. These resistance band workouts wake up hips and thighs, preparing joints for heavier efforts. Their small size makes them perfect portable strength training tools for hotel rooms or parks. -
What are progressive tension basics when programming resistance band workouts?
Progressive tension basics involve gradually increasing challenge by stepping farther from the anchor, shortening the band, or upgrading to a thicker loop while keeping technique crisp. You can also add sets or controlled repetitions. The goal is to nudge difficulty, not spike it, creating steady strength gains with portable strength training that protects joints. -
How can I design recovery friendly sessions using resistance bands at home?
Recovery friendly sessions favor moderate tension, slower tempos, and higher awareness instead of maximal effort. Combining mobility drills with light upper body exercises and low‑load lower body activation keeps blood flowing without deep fatigue. Two or three short sessions per week using home fitness equipment like bands can support tissue recovery between heavier training days.